

Building a website with Qt, C++, and WebAssembly - The unconventional way


Introduction
Web development is truly a world of boundless possibilities, where the creative journey knows no limits. There's no limit to what you can create, the tools you make magic with, and the exciting journey of creation.
As we explore yet another path on this web development journey, you might be curious about my choice to take a different path, given the versatility and wealth of resources offered by HTML, CSS, and JavaScript. So, let's dive in together and uncover the intriguing reasons behind this unique web development journey.
Allow me to introduce you to some of the reasons why:
Cross-Platform Compatibility: Qt is known for its ability to be run on multiple platforms including web browsers, without needing to make code changes. This would help maintain a consistent code base and user experience across different platforms.
Performance Requirements: Qt applications, when compiled into WebAssembly, can provide performance advantages in certain scenarios. This is especially relevant for applications that require intensive computation or real-time processing.
Code Security: After writing code in Qt, It is compiled to WebAssembly which is run in a sandboxed environment.
Smaller File Size: WebAssembly code is compiled to a binary format that is more compact and can be executed by the browser more efficiently. This results in smaller file sizes for web applications, making them quicker to download and execute. This also improves loading times and user experience.
And lastly, for the fun and adventure of it😄🚀:
However, there are some other reasons to choose Qt over web technologies:
Leveraging existing codebase
Complex application logic
Access to native features
In as much as there are advantages to development with Qt, It is important to consider some challenges such as:
Web Development Ecosystem: The web development ecosystem, based on HTML, CSS, and JavaScript is well-established and widely adopted. Therefore, resources, community support, and other important needs are more accessible than those of the Qt and WebAssembly.
Learning Curve: Due to a lack of or insufficient resources on web development with Qt and WebAssembly, learning might require towing a shallow path and may even involve some trials and errors to get it right. Also if the development team is not familiar with the technologies, it will slow down development.
Compatibility: While WebAssembly is supported in most modern web browsers, compatibility issues can still arise, especially in older browsers.
Limited DOM Manipulation: Qt applications may have limitations in terms of direct manipulation of the Document Object Model (DOM) compared to traditional web technologies.
Getting started
Before beginning development with Qt, As a Windows user, you will need to set up your machine by installing some toolchains to enhance development. MinGW, a C/C++ compiler is important and if you decide to compile your application to the web, Emscripten will be required.
Installing MinGW
MinGW (Minimalist GNU for Windows) is a development environment for Windows that allows you to build and compile native Windows applications using the GNU toolchain. It provides a set of tools and libraries that enable you to work with C, C++, and other programming languages. Here's a step-by-step guide to installing MinGW:
To install,
Visit mingW to download for Windows 10/11.
Run the installer and follow the instructions provided.
Alternatively, you can follow this well-explained video to download and install MinGW.
Emscripten Installation and setup
The next step is to install Emscripten, A toolchain for compiling WebAssembly to the browser.
Emscripten is a compiler toolchain that can convert C and C++ code into WebAssembly (Wasm) and JavaScript. It is often used for running high-performance, natively compiled code in web browsers, enabling web applications to perform tasks that were traditionally reserved for native desktop applications. Emscripten has gained popularity for porting existing C/C++ projects to the web, such as games, emulators, and scientific simulations.
- Visit the official Emscripten page and follow the instructions to install.
However, if you're still unable to install Emscripten after following the above process, you can set up the WSL environment to enable you to install Emscripten in a Linux environment.
Installing WSL
WSL is a feature introduced by Microsoft to bridge the gap between Windows and Linux. It allows you to run a Linux distribution within a virtualized environment on your Windows system. This environment includes a Linux kernel and user-mode utilities, making it possible to run native Linux applications and command-line tools without the need for a traditional virtual machine or dual-boot setup
Here are the steps to install WSL on your Windows machine:
1. Check System Requirements:
WSL is supported on Windows 10 and Windows 11.
Ensure that you have a 64-bit version of Windows.
2. Enable WSL Feature:
Open PowerShell as an administrator. You can do this by right-clicking the Start button and selecting "Windows Terminal (Admin)" or "PowerShell (Admin)."
Run the following command to enable the Windows Subsystem for Linux feature:
  bashCopy code
  dism.exe /online /enable-feature /featurename:Microsoft-Windows-Subsystem-Linux /all /norestart
3. Install a Linux Distribution:
Open the Microsoft Store app on your Windows system.
Search for your preferred Linux distribution, such as Ubuntu, Debian, or others.
Click "Install" to download and install the distribution.
4. Launch and Set Up WSL:
After installation, launch the installed Linux distribution from the Start menu.
Follow the initial setup instructions, which typically involve creating a user account and specifying a password.
5. Update Package Manager (Optional):
Open the Linux distribution's terminal.
Run the following commands to update the package manager:
  bashCopy code
  sudo apt update
  sudo apt upgrade
You now have a Linux distribution running within WSL on your Windows machine. You can use it to execute Linux commands, install software, and even perform development tasks. WSL provides a powerful environment for web development, application testing, and other Linux-related tasks on a Windows platform.
Introduction to Qt
Qt, pronounced “cute” or Qt is a cross-platform software for creating GUIs, Graphical User Interfaces, and cross-platform applications that run on various software and hardware platforms such as Linux, Windows, macOS, Android, and embedded systems.
Qt is available as an open-source option for individual users and offers a commercially licensed version tailored for organizations.
Qt supports various compilers, including GCC C++ compiler, the Visual Studio suite, and PHP via an extension for PHP5, and has extensive internationalization support. Qt supports a design studio, an IDE known as Qt Creator, Qt Quick which includes a declarative scripting language known as QML which allows the use of JavaScript to provide the logic. Qt Quick enhances rapid development of applications. Since Qt supports various compilers, Logic can still be written with native code to achieve the best possible performance.
Getting started with Qt for C++
So far, we have been able to:
Install MinGW for Windows
Install Emscripten for compiling C/C++ code to WebAssembly.
Next, we will be installing the IDE for development, Qt Creator.
1. Qt installation
Install Qt using the following step-by-step instructions.
Visit the official Qt website to download
Download the Qt Online Installer suitable for your operating system (Windows, macOS, or Linux).
2. Run the Installer:
Execute the downloaded installer. On Windows, it's typically an executable file (e.g.,
qt-unified-windows-x86-3.3.1-online.exe).On macOS, open the .dmg file and drag the installer application to your Applications folder.
On Linux, make the installer script executable and run it using the terminal.
3. Configure Installation:
Upon launching the installer, you'll be prompted to choose the installation options. The installer typically provides both open-source and commercial versions of Qt.
Select the open-source version if it suits your needs, or choose a commercial version if you require advanced features and support.
4. Choose Components:
- In the installer, you can select the Qt components you want to install. Qt offers various libraries and tools, so choose the components that are relevant to your project. Common components include Qt Framework, Qt Creator (the integrated development environment), and Qt Designer.
5. Installation Directory:
- Choose the installation directory where Qt will be installed on your system. The default location is usually suitable, but you can customize it if needed.
6. Licensing:
- If you choose a commercial version of Qt, you'll be required to enter your license information during the installation process.
7. Start Installation:
- Click the "Install" or "Next" button to start the installation process. The installer will download and install the selected Qt components.
8. Installation Complete:
- Once the installation is finished, you'll receive a confirmation that Qt has been successfully installed on your computer.
9. Qt Creator Setup (Optional):
- If you installed Qt Creator, launch it, and configure your development environment. You can create a new project, set up build kits, and start coding with Qt.
10. Verify Installation:
- To ensure that Qt has been installed correctly, you can create a simple Qt application or open an existing project and build it.
I have also curated a list of videos to help with your installation so you don’t miss out on something.
However, If you’re not able to install the complete Qt Framework as a package, This mirror version of Qt Creator is available for your different devices https://qt.mirror.constant.com/official_releases/qtcreator/11.0/11.0.2/
Creating and building a Qt widget project
After you have successfully installed Qt Creator on your system, you can launch it to start development. This is what the launched screen looks like.
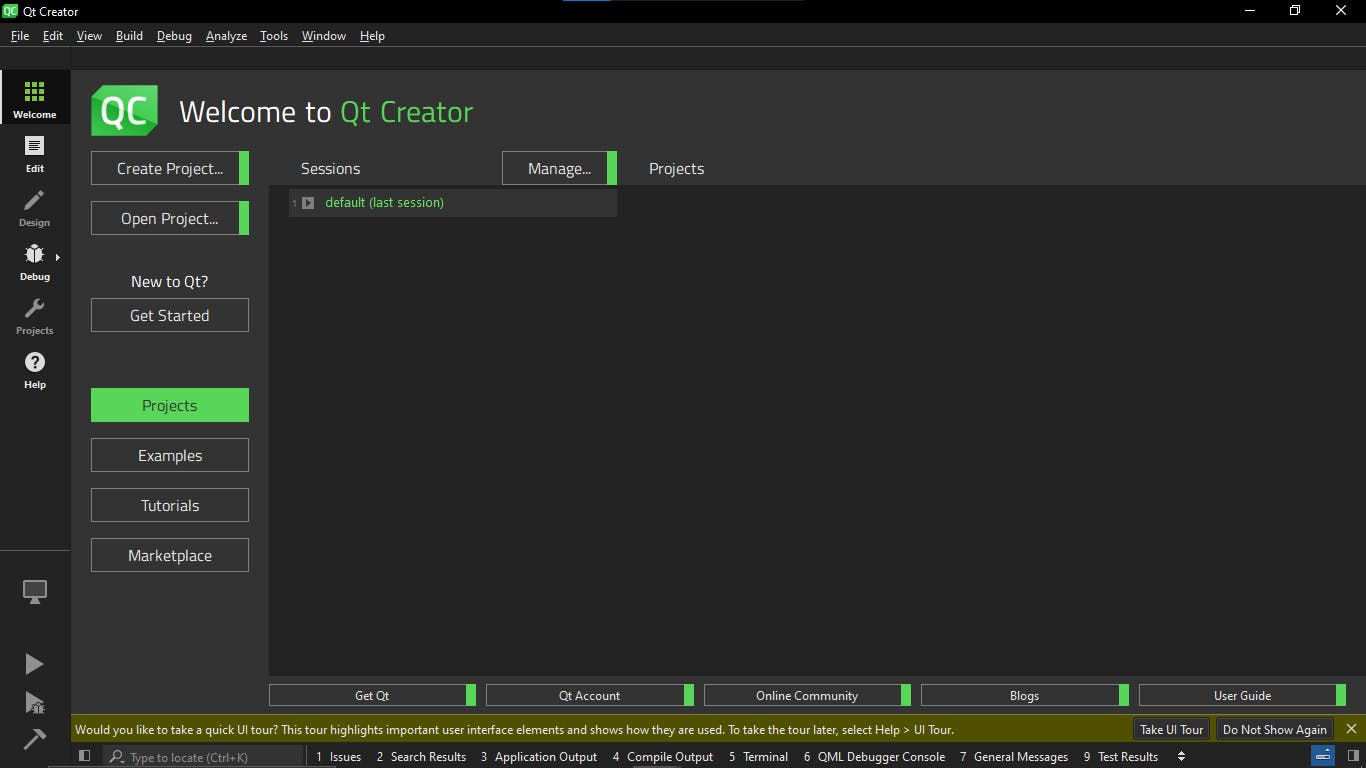
After you have successfully installed Qt Creator on your system, you can run it to start developing Qt-based applications. Qt Creator is an integrated development environment (IDE) that provides a range of tools for designing, coding, testing, and debugging Qt applications. Here's how to run Qt Creator:
Launch Qt Creator:
On Windows, you can usually find Qt Creator in the Start menu or use the search feature to locate it.
On macOS, open the Applications folder and look for Qt Creator. You can also search for it using Spotlight.
On Linux, you can start Qt Creator from the application menu or by running the
qtcreatorcommand in the terminal.
Welcome Screen:
- When you first run Qt Creator, you will see a welcome screen. This screen provides quick access to various options, including creating a new project, opening an existing project, or checking out the latest news and updates related to Qt development.
Create or Open a Project:
To start working on a new project, click "New Project" and follow the wizard to create a Qt project.
Select Application, then Qt Widgets Application, and click continue.
Rename your project to what you wish, then click next.
Select a build system, preferably qmake then next.
Specify basic information about the classes: You don’t necessarily need to make changes here.
Select language (optional)
Select kits: You can choose to build with Desktop, Android, or WebAssembly. It all depends on your project specifications.
Summary: Review your project details then, click “finish”

Basic files included in the Qt widgets application build
.pro File (Project File):
- The project file (with a .pro extension) is used to configure the project and specify its build settings. It includes project-related information and lists the source files, header files, and additional dependencies. This file is maintained using qmake, a build system tool that generates makefiles for building the application.
Sources:
- Main Window Class (main.cpp):
- The main.cpp file contains the entry point for your application. It usually creates an instance of the QApplication and the main application window (QMainWindow or a custom widget) and then starts the Qt event loop.
- Main Window Class (MainWindow.cpp and MainWindow.h):
- The main window class typically derives from QMainWindow. It represents the main application window, which contains various widgets and controls. You design the GUI layout in the .ui file (see below) and connect signals and slots to implement application behavior.
Header file:
- MainWindow.h
- This is a custom class derived from QApplication. It represents the application itself and handles application-wide settings, such as application name, version, and settings. It can also be used to implement application-wide functionality.
User Interface (UI) File (mainwindow.ui):
- This XML-based file is created and managed using Qt Designer or Qt Creator's integrated visual designer. It defines the layout and design of the main window, including widgets, menus, and toolbar components. The .ui file is converted into C++ code using the uic (User Interface Compiler) tool.
Resource File (resources.qrc):
- A .qrc file is used to manage and embed application resources, such as images, icons, and other assets. It can be edited in Qt Creator's resource editor, and it simplifies the deployment of resources with your application.
- Build and Run:
- To build and run your project, select the appropriate target and kit from the toolbar, then click the green "Run" button. This will compile your code and execute the application.
Integrating Qml into a Qt widget project
Qt Quick and the QML (Qt Meta-Object Language) are essential components of the Qt framework, designed to simplify and streamline the development of user interfaces (UIs) for desktop, mobile, embedded, and web applications. QML is a declarative, JavaScript-based language that allows developers to define UI elements and their behavior using a syntax that closely resembles JSON and JavaScript. Qt Quick, on the other hand, is a set of libraries and tools within the Qt framework for building fluid and interactive UIs with QML.
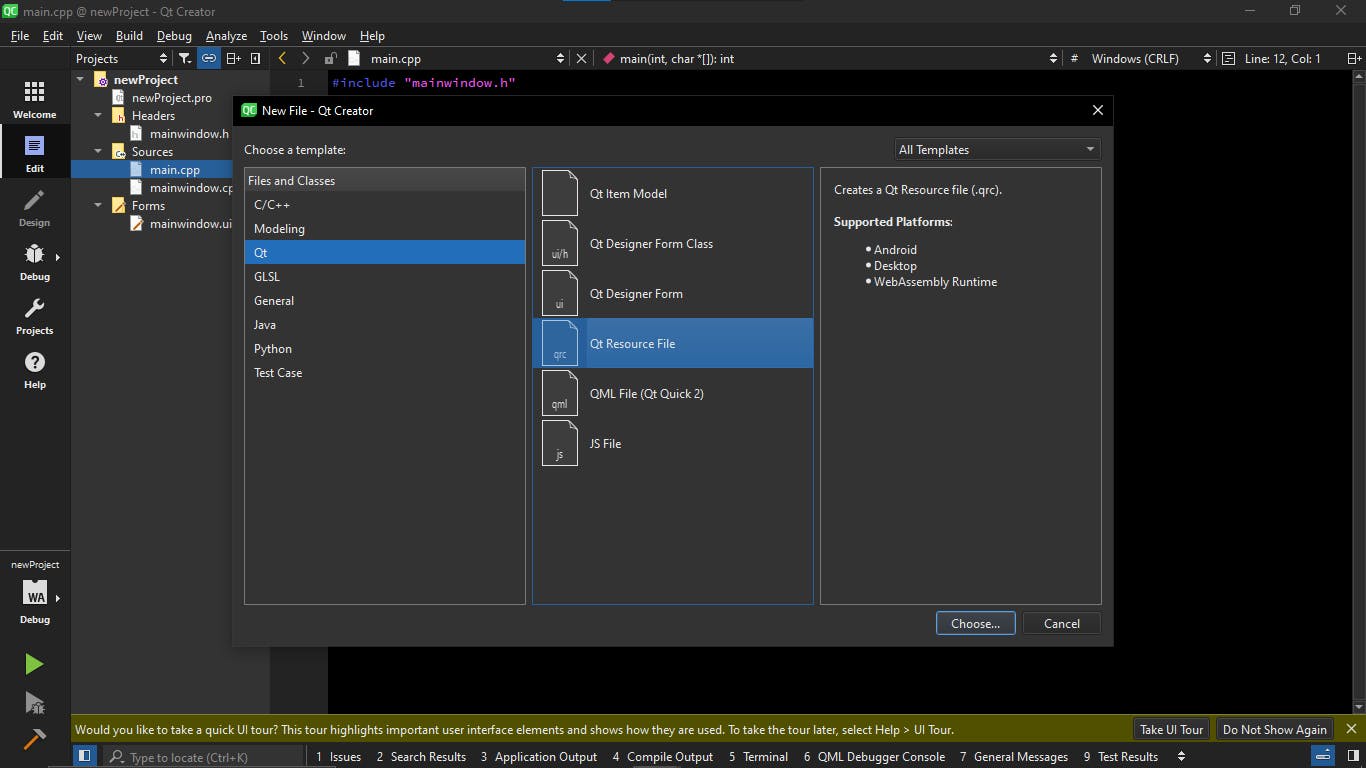
Step 1: Add a Resource File (.qrc)
- In Qt Creator, right-click your project in the project explorer, then select "Add New..." and choose "Qt" > "Qt Resource File." Give the resource file a suitable name, such as "main.qrc."
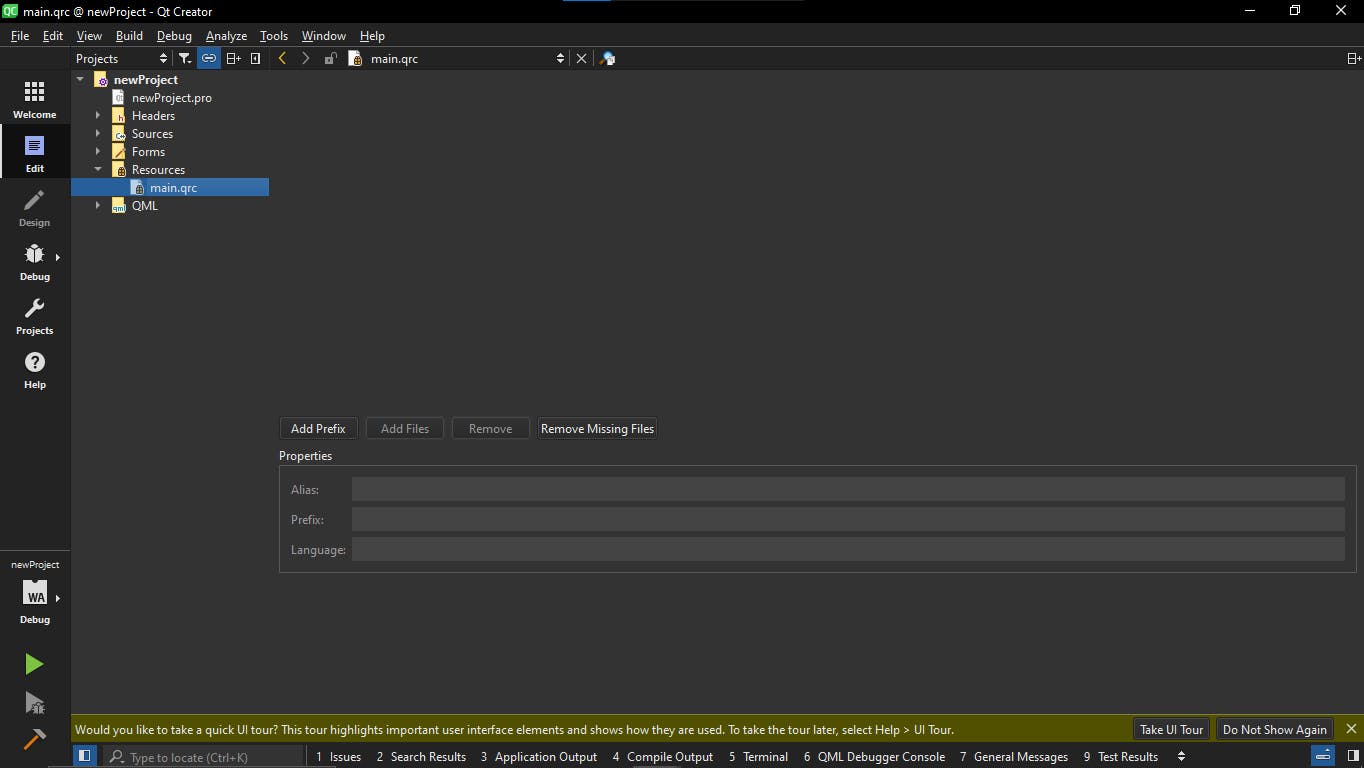
Click on “Add Prefix” and name it “/main”.
Add the assets you want to include in your project by right-clicking the appropriate resource directory or subdirectory and selecting "Add Files From...". This allows you to select multiple files at once.
Save the resource file (Ctrl + S or Cmd + S) to keep your changes.
Step 3: Creating QML Files:
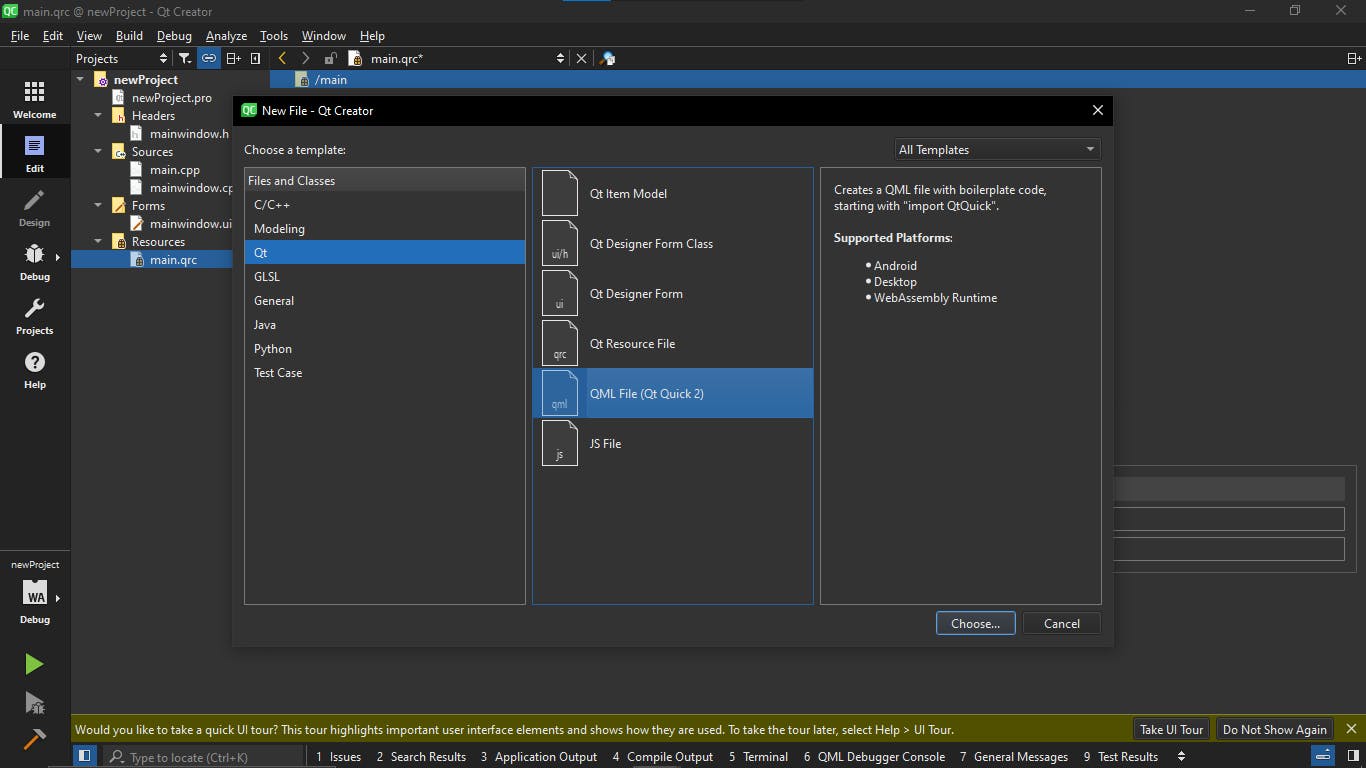
Right-click on your main.qrc, select “add new”.
Select a QML file, then click “Next”.
Name your QML file and click “finish”.
Step 4: Configure QML at the entry point of your project (main.cpp)
- Create a QML Application Window
In your Qt Widget project, create a QWidget or QMainWindow that serves as the container for your QML user interface. You can design this window using the usual Qt Widgets, such as buttons, menus, and other widgets. In the same window, you'll embed a QQuickWidget to host the QML content.
- Embed QML Content
Inside your QWidget or QMainWindow, add a QQuickWidget to embed the QML content. Here's an example of how to do this in C++ code:
#include <QGuiApplication>
#include <QQmlApplicationEngine>
#include <QQmlContext>

int main(int argc, char *argv[]) {
    QGuiApplication app(argc, argv);

    // Create a QQmlApplicationEngine
    QQmlApplicationEngine engine;

    // Load the QML file directly
    engine.load(QUrl(QStringLiteral("qrc:/qml/main.qml")));

    // Check if loading was successful
    if (engine.rootObjects().isEmpty())
        return -1;

    return app.exec();
}
In this code, main.qml is the main QML file you want to display. You can replace it with the appropriate QML file path for your project.
Step 5: Run Your Project
Click on the “green” play icon to run your project. You should see the Qt Widget-based window with the embedded QML content.
Step 7: Interact with QML from C++ (Optional)
If you need to exchange data or signals between your Qt Widgets-based code and QML, you can use the QML-to-C++ and C++-to-QML communication mechanisms provided by Qt's Qt Quick module. This allows you to connect signals and slots, define properties, and share data between the two worlds.
By following these steps, you can seamlessly integrate QML into your Qt Widget project, allowing you to create dynamic, modern user interfaces with the flexibility of both Qt Widgets and QML.
Step 4: Adding other resources like images and fonts
In your local file explorer, organize your images and fonts into separate directories.
In Qt Creator, right-click on “main.qrc”.
Hover over “open with”, then select “resources editor”.
Click “Add Prefix” and change the title to anything you want e.g. "/img".
Select “Add files” to add files from your file explorer.
Save the resource file (Ctrl + S or Cmd + S) to keep your changes.
If you have successfully added these files, it will show in this manner:
Conclusion
Whether you're just starting by setting up your development environment or you're diving into the beauty of QML, Qt empowers you to create robust applications with ease. There are other areas to explore such as mobile native application development, desktop applications, and embedded systems.